
A Freelancer’s Guide: Managing Multiple Client Social Media Accounts in ClickUp

How to take away the overwhelm of juggling multiple SMM clients + thrive
This site contains product affiliate links for ClickUp. I may receive a commission if you make sign-up after clicking on one of these links.
Social media freelancers know how overwhelming it can be to manage multiple clients at the same time. 😫
When you're single-handedly responsible for strategy, content creation, publishing, ads, community management, reporting, all while managing the client and your business, it's easy to understand why.
Not only that, social media management tools can be very expensive and have limitations, and if you're already paying for a number of other more important tools, it may not be feasible to invest in at this time.
Never fear! I promise you it can get worlds better with structure and the help of ClickUp – a tool that allows you to build your complete end-to-end business for only $7 USD per month!
In this guide, I'm going to walk you through a ClickUp setup for freelancers (and multi-team member agencies) that streamlines every aspect of client social media management into one easy-to-use, easy-to-navigate workflow.
The 4 steps to managing multiple client social media accounts:
Get all this ClickUp goodness right to your inbox 👇
Is it worth my time to setup a whole thing in ClickUp?
Fair question. It's not like us freelancers have a surplus of free time, so I get the concern.
For me, building my business in ClickUp totally changed how I felt about myself as a business owner.
I went from feeling like everyday was a scramble, to having one place I could go to manage every single aspect of my business. It was empowering!
So it's not just about using ClickUp for client social media management.
It's about wanting to legitimize your business so you can take on more work confidently without drowning.
You need to have the desire to step into your power as an entrepreneur and realize just how much control you can have in creating the business, and the life, you want for yourself.
Starting with client work in ClickUp can be your step one in many empowering steps you'll take to build your business and your confidence!
How to successfully manage multiple client social media accounts at once in ClickUp:
1. Create boundaries & expectations with your clients
The key to having a freelance business that doesn't suck you dry starts with boundaries and expectations.
👉🏻 If we are too available, it becomes the expectation to be available all the time.
👉🏻 If we don't set expectations, clients behave how they think is appropriate or helpful which may not jive with how we like to work.
Being stressed out and frustrated about needy clients probably isn't going to help you do your best creative work either.
Creating boundaries and defining expectations is a key part to protecting your energy and keeping it elevated – so you can love what you're doing and the life you're living.
How to define boundaries and expectations with clients
This can start as early as the sales process by including an engagement letter with the contract outlining key things you want them to know in advance about working together.
I like to have clients initial beside each key point when they're signing the contract so the importance is clear and I know they've read it.

Some ideas include how you communicate with clients (where, when, and how), results disclaimers that mention algorithm or reporting changes, results timeline expectation setting, or outlining client accountability expectations.
I would also suggest limiting the channels they can reach out to you on (ie, avoid being in their Slack if possible as that can get out of hand quickly). Instead, you can set defined office hours bookable via a Calendly link, or at the very least, define when you are online on their Slack and can expect a response.
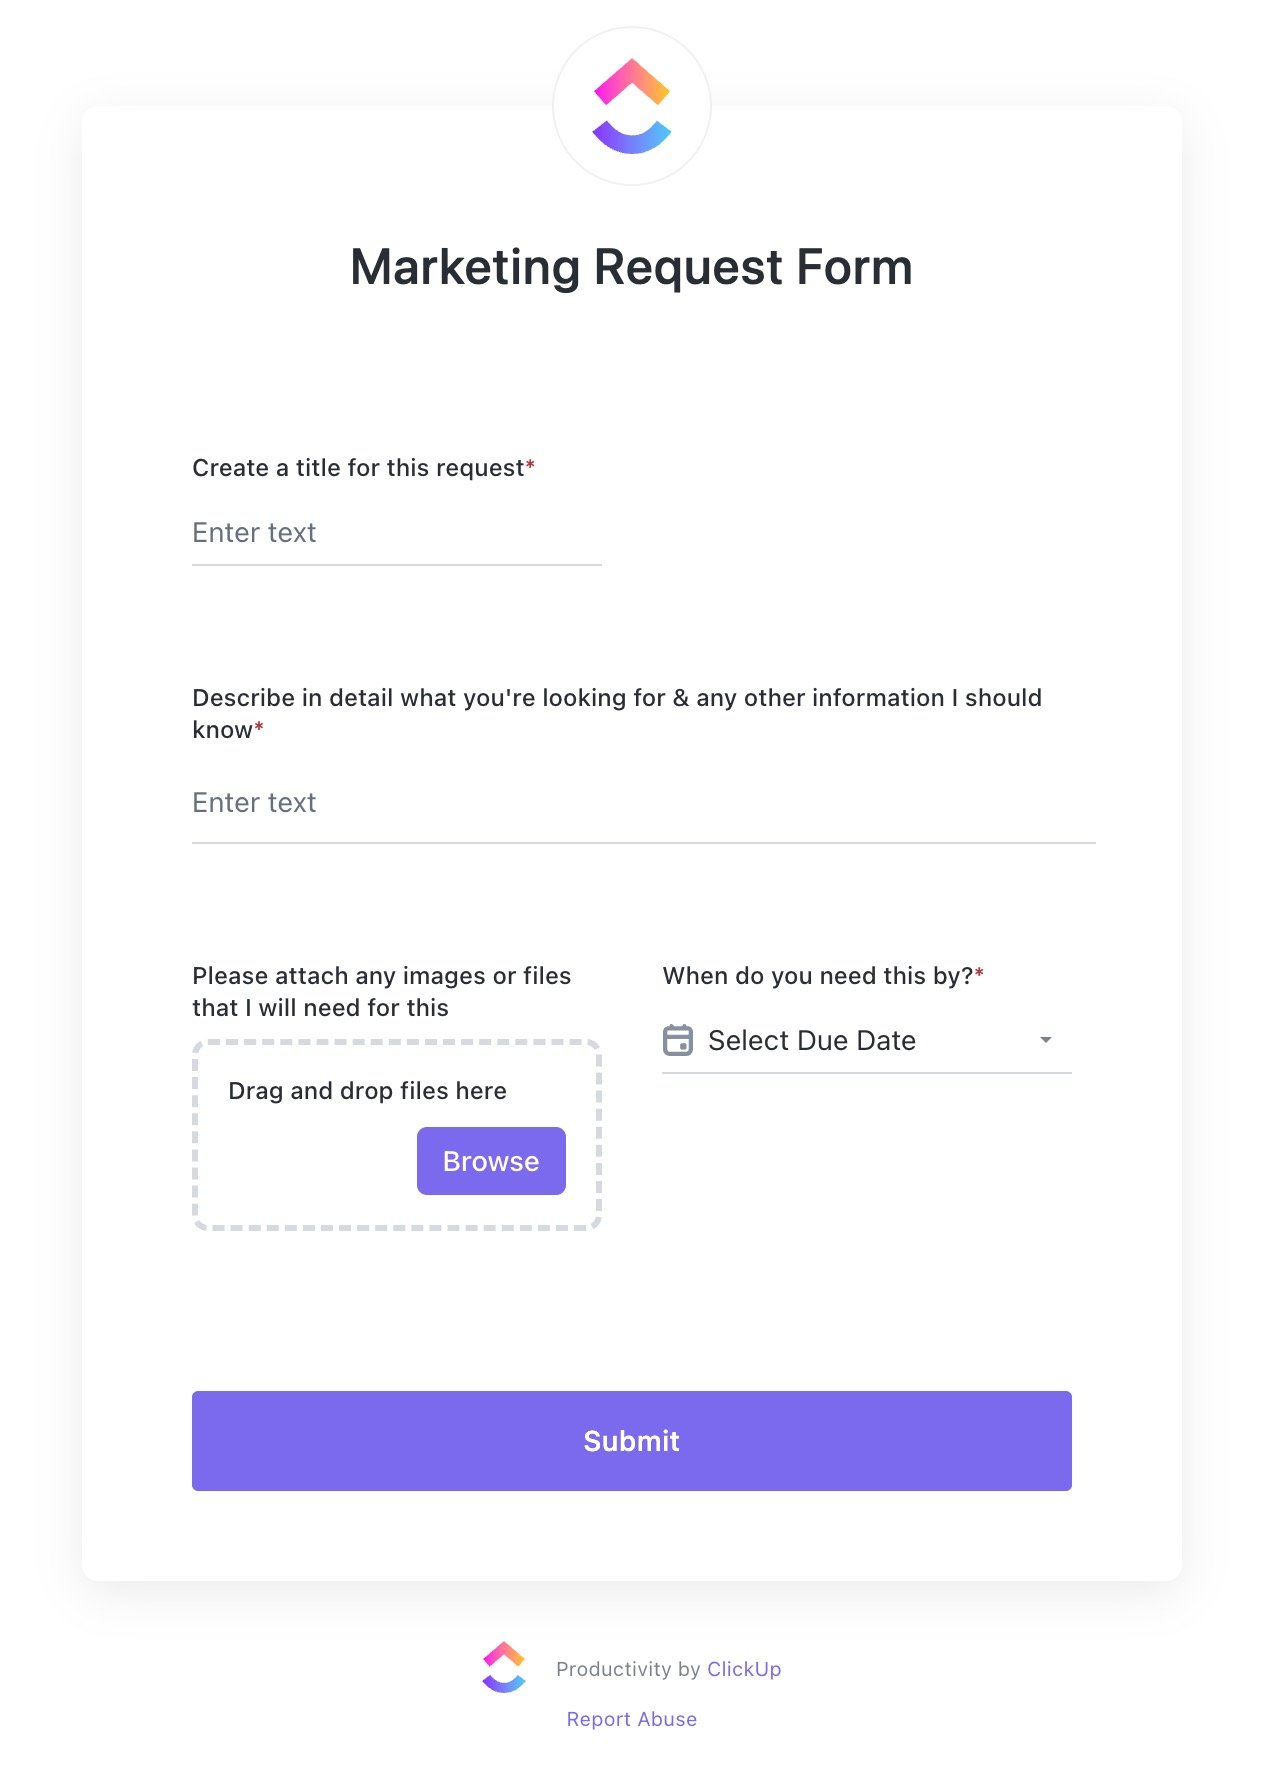
ClickUp forms are a great way to funnel requests made via email or DM into a defined request process. You decide what information they have to provide so you're briefed properly, and ClickUp creates a task for you automatically, reducing inbox clutter.
2. Follow a streamlined content creation process for all clients
Whether you're working by yourself, or with a team, having a defined process makes it a lot easier to bounce from account to account and feel like you actually know what's going on.
Now I know what you're thinking: I don't want to bog myself down in some complicated process when it's just me.
Keep in mind: any big changes to process are scary at first. 😱
What I ask you to do as you read through this guide is envision what it would feel like for everything to run smoothly.
The initial hurdle to adopting something new like this will quickly be forgotten once you start to see the benefits and just how much lighter your mental load will be.
Yes, using spreadsheets can work, but man-oh-man can it get out of hand quickly.
Every social post is a task in ClickUp
It all starts with the simple concept of each social post being it's own ClickUp task. Why?
If you want to post on Instagram, it's not as simple as just deciding you're going to post.
You have to think about what kind of post you'll create, what it will be about, what it will look like.
You have to write the copy and design the creative.
You need to get the client to review it, and provide their feedback.
And incorporate their feedback before scheduling it.
When we create each social post as a ClickUp task, it gives us the ability to go through each stage with every single post all the way through to completion.
Each post can move physically through a series of views that represent each stage of the process.
Ideation ➝ Execution ➝ Approval ➝ Publishing
Physically moving posts from one view to the next removes unnecessary mental clutter so when you're working on copy and creative, you're only seeing the posts that are in that stage of the process.
And it's all customizable to how you work
The best part about using ClickUp for this? You can customize it to exactly how you work.
That means one client's content creation view can look differently from another, depending how you collaborate.
You can keep it basic and simple, or build on to account for more collaborators and additional client touch points.
I'm going to walk you through two different content creation scenarios and how you could create them inside of ClickUp.
Remember: there is no one way to do anything in ClickUp.
It's only right if it serves you so I encourage you to think about your process and how ClickUp can be built to simplify and streamline how you work.
Scenario 1: A simple content creation workflow for solopreneurs
Lets say you're the only person on your team, which probably means you don't follow a very structured process because you don't really have to.
It can be done with spreadsheets, calendar reminders, emails, jotting down notes and however else you work.
But when it comes to growing your business and adding more clients or hiring a freelancer to help you – it becomes a lot more difficult without a clear and simple workflow.
Let's walk through a simplistic structure in ClickUp that doesn't overcomplicate what you're already doing while also creating an easier way of managing your workload and collaborating with the client.
The phases of content creation as a ClickUp custom field (not a status)
When it comes to creating content for a client, I have always followed the same steps: ideation, execution, client review, ready to schedule, scheduled, and published.
So you may be thinking: why not set up a custom task status for this? 🤔
Below is what I setup initially… but I implore you to consider instead using a custom field rather than a custom status. Why? For the main benefit of ONE consistent task status across all of your lists.

I talk about the importance of a simplified consolidated approach to task statuses extensively when it comes to streamlining how you manage client work, and creating social content (or content of any kind) is no different.
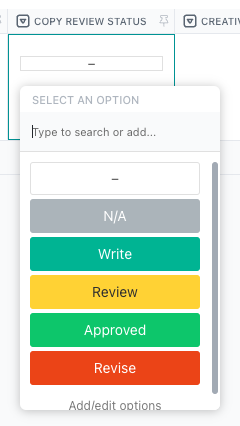
So instead of using a custom task status, use a custom field instead to replicate the stages of completion and every post we create inside of ClickUp can move through each phase of the process individually.

We're going to use this custom field as a way to physically move each post through the series of views we have setup to replicate our creation process: calendar build, approvals + scheduling, & content library.

Step 1. Building your monthly content calendar
Now that we have our custom field status' and our views, we can get started on building out our calendar.
Maybe you like to create one week sprints of content, or build out a full month of content at once.
Using a table view in ClickUp, we can easily create all of our post ideas exactly as we would in a spreadsheet, categorizing them by content pillar, content goal, post type, and anything else you like to include.
As you're planning out your content, you can use checkbox custom fields to plan ahead for link in bios and if you've got a link already, include it in a link field.
Sharing the same post to Facebook? Check that off too.

Maybe you like to scroll through Instagram or Facebook and save posts you'd like to replicate. Include links or attachments for design inspiration if that serves you.

The goal of this stage is simply to build out a framework so you can just sit down and create when the time comes.
Step 2. Create the content & move into approval stage
With your snazzy new content framework, now it's time to tap into those creative juices and do what you do best!
Write your copy, attach the creatives, define the hashtags.
Now these posts are ready for the client to review.
Using a custom field for final post status, we can easily indicate which posts are ready for the client to look at by setting them to Review.

If we want the post to physically move out of the Calendar Build view, so we can declutter our creation space and focus in on the posts that still need to be created, we can use view filters.

Moving posts ready for client approval out of our calendar build view makes it so we only see the posts we're working on in build, and the client only sees the posts ready for approval in approvals.
It's important to note that using these filters means if the client incorrectly removes the final post status instead of setting it, it will "disappear". This can be confusing for clients, so it's important to create training guidelines of how the system works.
Step 3. Client feedback
Each view has a unique link, so you can send clients directly to the approvals view when the content is ready.
Using a client approvals view allows us to remove a lot of the unnecessary information that we used during the build phase that they don't need to see.
They can easily provide general or copy feedback in the comments, or leave creative-specific feedback on the graphic or video.
Giving the client a simple approval status makes the whole review process effortless and easy.
I like to reserve the comments just for client feedback. Using comments allows us to respond to them if necessary (so you can kindly tell them that the copy will stay as is 😂)
Step 4. Scheduling
Since we're making this process as simple as possible, we're using the same view for scheduling as we are for client approvals.
That way you can see which posts they've set to approved, and use the same fields to schedule posts natively in-platform.
To complete the lifecycle of a post, we're using a publishing status custom field to indicate if it's been published.
If a post requires a manual publish – which no matter how sophisticated these third-party scheduling tools get, there is still almost always a manual post that needs to go out – we can set it to manual publish and assign it to the individual responsible for publishing.
Since each post is a task, it will show up in their list of tasks on the home screen for that day.
They can access the content from the ClickUp mobile app as well, so it can be done from anywhere.
When the scheduling status has been set to scheduled, meaning it's complete, it moves out of the approvals + scheduling view and into a content library.
We leave the manual publishing posts in the scheduling view, so it's crystal clear which posts still need some kind of action.
We can use a Kanban visual board to organize the content library by post type, content pillar, or any other field you prefer.
The calendar views allows us to see every post that went out and when from a high level.
Scenario 2: A more complex content creation workflow for multiple contributors
Collaborating with contractors
If you have a larger client you couldn't possibly do on your own, or you're at the point in your business where you have contractors to help with specific things – you need a slightly more complex workflow.
Working with contractors on client work typically means you have some kind of internal review before their work goes on to the client.
If you have contractors doing specific things for content (graphic design and copywriting typically), then you likely do individual rounds of reviews with each person.
An increase in client collaboration
If you have a more hands-on client, there may be more touch points required throughout the content creation process.
I like to involve clients in the calendar creation process and get their review and approval before we move posts into execution.
This helps to eliminate the chance of us missing something they wanted to cover, or misunderstanding a concept and incorrectly creating it, only to have to change it further down the line.
Another touch point you may want to incorporate is requesting specific content from your client (for example, film a 15 second clip of yourself doing...).
This has become a bit more necessary with the volume of video content required for Reels, and it can help you stay nimble.
Extra Step 1: Providing feedback + approval to contractors
Let's say you're working with a graphic designer and a copywriter, and it's your job to review and approve their work before it goes to the client.
We can build on to our content workflow by adding additional custom fields for internal reviews of copywriting and graphic design.
That way each contributor knows the status of their work, and the stages of content execution can be more fluid, meaning not every post needs to be finished at the same time.
I've used a graphic design Kanban card view before that my graphic designer enjoyed using so she could focus only on her deliverables.

Extra Step 2: Providing adequate direction to your contractors
If it's your job to provide creative direction to your graphic designer before they get started or you're just getting started working together, you might want to add a creative direction long text custom field and use that alongside the inspo url and attachment fields.

When you're finished and the post is ready for design, you flip the creative status to "design" and the designer can easily see which to start.
When they've finished and attached their work, they can set it to review, and so on, until it's approved.
We've also included a long text field for internal creative feedback, reserving the actual comments field for client feedback (so they don't see our internal communications).
The same can be done for copywriting, along with long-text custom fields slides 1 to 10 for carousel post copy, so it can be provided for the graphic designer.

To keep track of copy versioning, you can add an additional copy field for final revisions. It's important to know that any information in custom fields, once deleted, cannot be recovered.
Extra Step 3: Managing more involvement from the client
I find it really helpful involving clients in the content calendar build process to ensure nothing is missed and everything important is included within the allotted number of posts.
This can look a few different ways:
If they're tech savvy, you could ask them to contribute directly to the content calendar build view and input their ideas filling in the required fields.
It's likely easier for a client to do a proper brain dump into a document instead, so I like to have a Client Tasks list, with content idea tasks for each month.

Inside of the task, you can link to a living Content Ideas ClickUp doc with a template for each month. Use templated headers in each doc to ensure the client knows what to include.
If they're less tech savvy, you could send them an email with a link to the ClickUp doc instead of creating a task for them. Whatever works for you and the client.
Once their ideas have been incorporated, and we know how many posts we have left for the month, we can go ahead and slot in our ideas.
This can be really fun to do together as a team with contractors, so everyone's ideas are included and when it comes time to execute, they'll be able to jump right in.
When all of our ideas are inputted, we can flip the topic status to pending approval and ask the client to review, providing any necessary feedback in the comments before the posts can go into execution.

3. Track your scope closely so you don't go over
A crucial ingredient to the formula for successfully managing multiple client social accounts is... keeping it profitable!
And the only way to know if your business is profitable is to track the work you're doing for them against what you sold (your scope of work).
If you priced your services based on # of posts...
You can use a dashboard to track the number of posts being created for each client.

Each client can have their own dashboard, or you can create one mega dashboard for all clients and see every account from a high-level.
If you're billing your client by # of hours or retainer...
Or honestly, even if you are charging by # of posts, it's still helpful to know how much time you're spending in the account to calculate how profitable it is.
It's also incredibly helpful to know where you're spending that time!
In the example below, if we wanted to make this a more profitable client, we would need to find a way to reduce how long we're spending on social media management since its accounting for 80% of time spent.
If a client pays you $2000/month, and your desired hourly rate is $100, that means you can provide them with 20 hours of scope before the returns start to diminish.
Monitoring these numbers empowers you with two choices if you aren't making what you want:
Charge them more
Find a way to simplify how you work to save time
If you want to know exactly where you're spending your time...
For example, if you have a contractor for copywriting and you want to monitor how much scope is being allocated to copy, you can use task tags for each department and filter by tag on your dashboard.
For example, any copywriting tasks are tagged with copywriting, graphic design, project management for scheduling, etc.
This can provide a lot of clarity about the packages you offer and the breakdown of work required which can help you potentially price more effectively.
4. Create a ClickUp report database & streamline delivery
To save time (ie scope), and create a positive client experience (+ increase retention), we can use ClickUp to simplify our reporting process.
ClickUp documents are so versatile, and it's super easy to create a dynamic reporting database and link all reports within it.
Below is an example of a reporting database for social ads separated into quarters for ease of navigation.

Below is an example of a social media management report database which is nicely branded, and incredibly easy to navigate.

ClickUp Docs can be templated, outlining each report to ensure each one is the same and includes all the pertinent details.
Use this one link to direct your client to receive their newest report without having to provide a unique link every time.
If I'm in a client's Slack, I like to include the reporting database link right in the bookmarks bar.
You can do this 💪🏻
Social media marketing is no joke.
Whatever you do, do not mistake a chaotic or disorganized business as failure: it's one hell of a business to wrangle.
ClickUp is the first of it's kind, making it possible for anyone to streamline an entire business from start to finish.
But if you're feeling a bit overwhelmed by all the possibility (it's pretty hard to comprehend TBH), you're 100% not alone.
Feeling Compelled to Organize your SMM Business?
Every business owner deserves to work less and enjoy life more.
I repeat: we DO NOT NEED to burn out to be worthy of wealth!
Suffering in the day-to-day is a killer for freelancers and agencies.
And now with advanced tools like ClickUp at our disposal, we don't have to anymore.
ClickUp can solve every pain point and make work and your business something you actually enjoy again!
If you want to give ClickUp a try, it would mean the world to me if you'd sign up using my affiliate link. I absolutely love creating this content for you, and this will help me know I'm on the right track 🙂
If you want my help with creating your own custom setup, book a meet and greet in my calendar and lets come up with a plan just for you.